Last Updated on July 24, 2022 by Oktay Sari
July 2022
IMPORTANT UPDATE: Microsoft announced the sunset for Windows Information Protection! WIP will be discontinued over time. Support for Windows Information Protection Without Enrollment will end by the end of calendar year 2022. Please read the official announcement and more on the following 2 sites:
- Announcing the sunset of Windows Information Protection (WIP)
- Support tip: End of support guidance for Windows Information Protection
If you have plans to implement WIP, I suggest you rethink your strategy accordingly. I will follow-up on this and update the WIP posts I have when more information is released by Microsoft.
In this post I’ll configure Windows Information Protection with enrollment for devices that are managed with Microsoft Intune. If you’ve configured automatic MDM enrollment for Windows 10, then all devices for users in the MDM user scope will automatically enroll in MDM. Therefore the Windows Information Protection with enrollment (WIP-MDM) policy will apply. In a previous post I wrote about configuring Intune MDM User Scope and MAM User Scope for Windows 10. It contains lots of relevant information so have a look at it.
For many organizations, data is something we take for granted as being safe, stored somewhere in the cloud or on-site servers hidden in a broom closet. A common misconception is that only the big organizations, governments, and businesses get targeted by cyber criminals. That’s just not true.
“There are only two types of companies: those that have been hacked, and those that will be.” Robert Mueller FBI Director, 2012
No matter what kind of data you’re storing in the cloud or on-site, data protection should be one of your biggest priorities.
This post is part of a series. Have a look at my other posts for more information
- Introduction to Windows Information Protection
- Configuring MDM user scope and MAM user scope
- WIP-WE / MAM – Windows Information Protection without enrollment
- Windows Information Protection with Enrollment (this post)
- Windows Information Protection User Experience
- WIP-WE User Experience – WIP Without MDM enrollment
- Set up Azure Rights Management for WIP
- WIP Without Enrollment Selective Wipe
- Troubleshooting Windows Information Protection
- Monitoring and collecting WIP audit event logs
- WIP Learning mode
- Limiting Access to SharePoint Online on unmanaged devices
- Limiting Access to Exchange Online on unmanaged devices
Prerequisites
Make sure you have all the prerequisites in place;
- Intune enabled as the MDM authority
- Windows 10 1703 and above (Pro, Enterprise, Education)
- EMS E3 licenses (or at the very least Intune and Azure AD premium P1)
Configuring your MDM user scope
Although it’s not a requirement, I recommend setting up Windows 10 automatic enrollment by configuring your MDM user scope in Azure AD. I dedicated another blog post on configuring MDM users scope and MAM user scope. If you need to know more about configuring these scopes make sure to read that post before you continue.
Creating a WIP Protection Policy
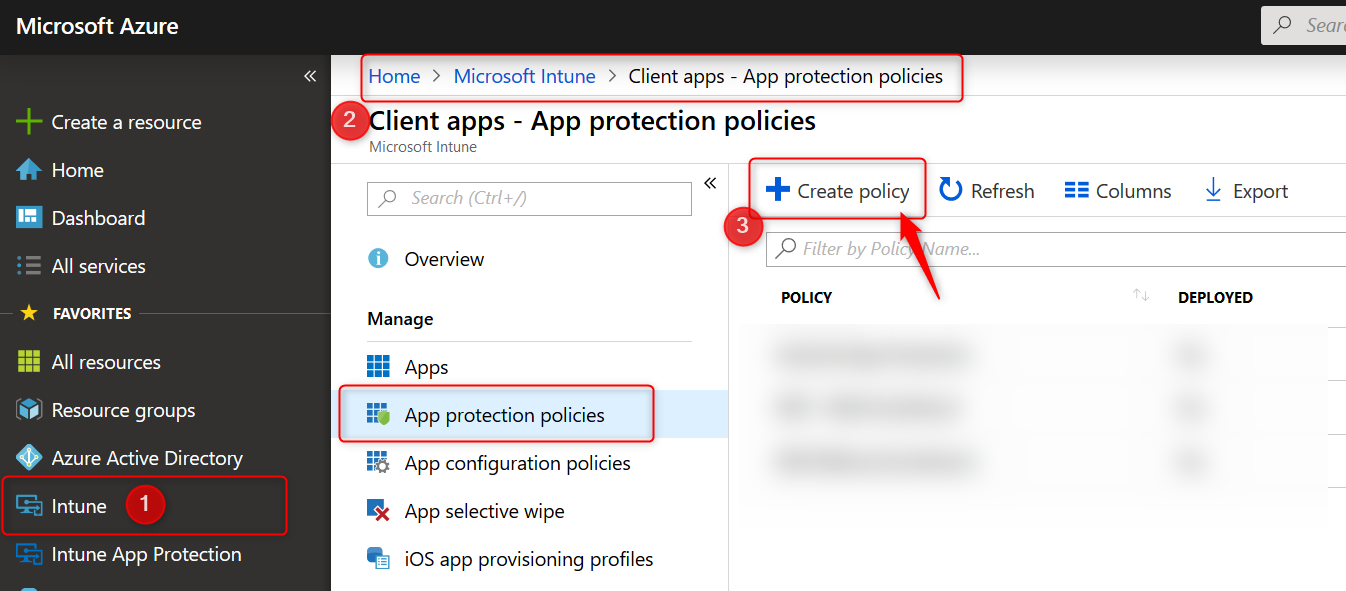
- Sign in to the Azure portal and Choose All Services > Intune.
- Select Client apps > App protection policies
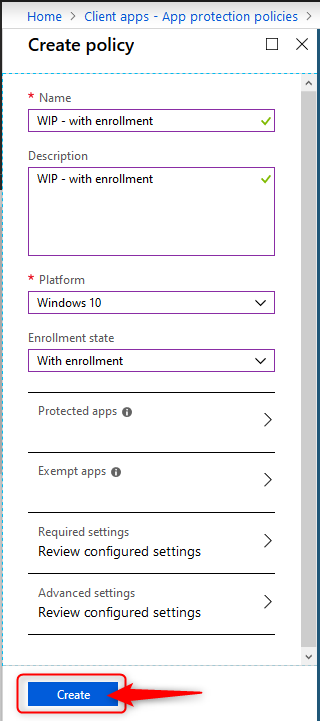
- Click on Create policy to create your Windows Information Protection with enrollment policy
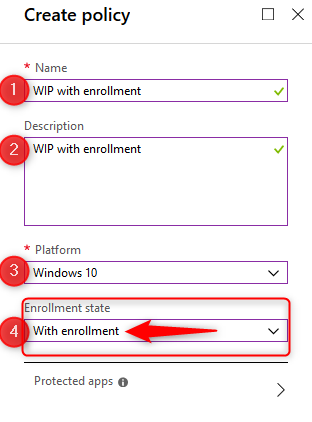
- Give the policy a name and a description. Choose Windows 10 as the platform from the drop-down menu.
- Finally select the Enrollment state. In this case we are creating a WIP policy for MDM managed devices, so select “with enrollment”
Adding apps to your WIP Policy
Let’s continue and select apps you want to allow or deny access to your corporate data. There are two kinds of applications you need to know about; Enlightened applications (MAM aware) and Unenlightened (MAM Unaware) applications. The difference is that enlightened apps can differentiate between corporate and personal data whereas unenlightened apps cannot. Read my previous post about WIP Basics to fully understand the solution. Also read the Microsoft blog for more information about configuring WIP policies and adding apps to your WIP policy.
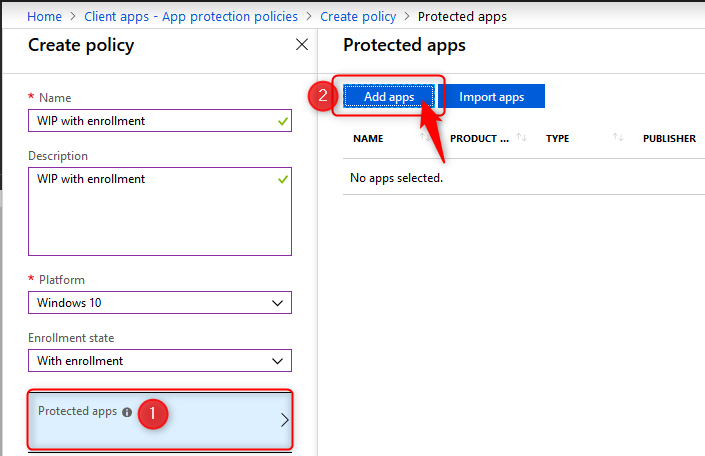
When you are ready to continue, click on Protected apps and then click on Add apps
- On the Add apps blade choose Recommended apps from the drop-down menu.
- Click on the select box next to NAME (See the arrow below). This will select all the recommended applications in the list.
- When you add applications to your protected apps list, they are setup as allowed by default. Make changes here before you continue
- click on OK at the bottom of the page.
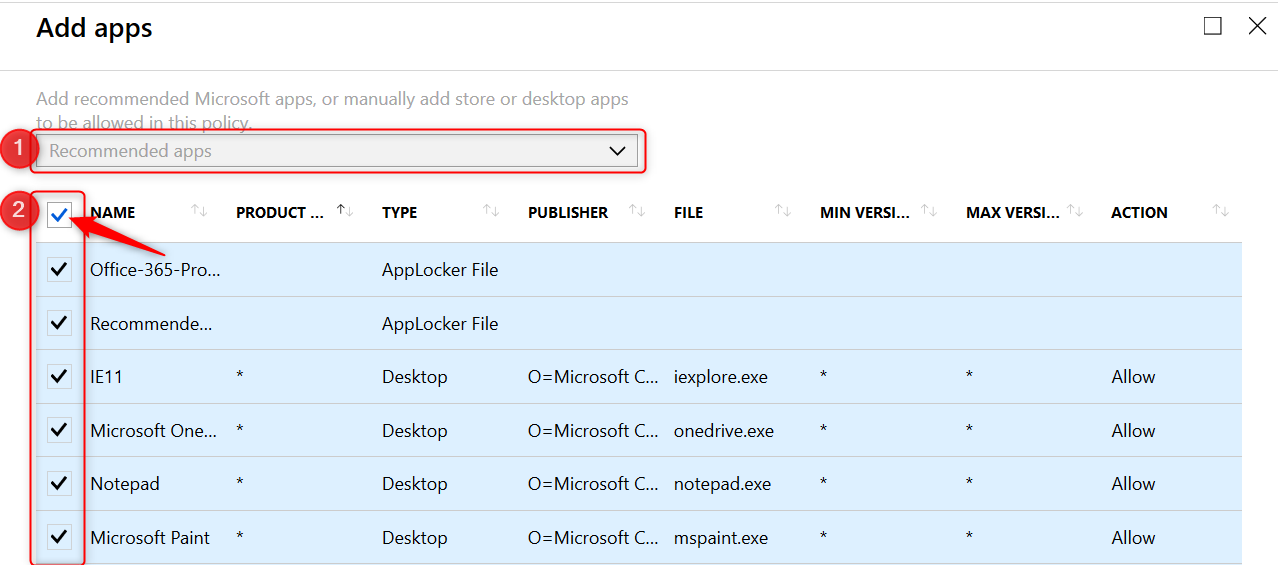
The Action column shows which applications are allowed or denied access.
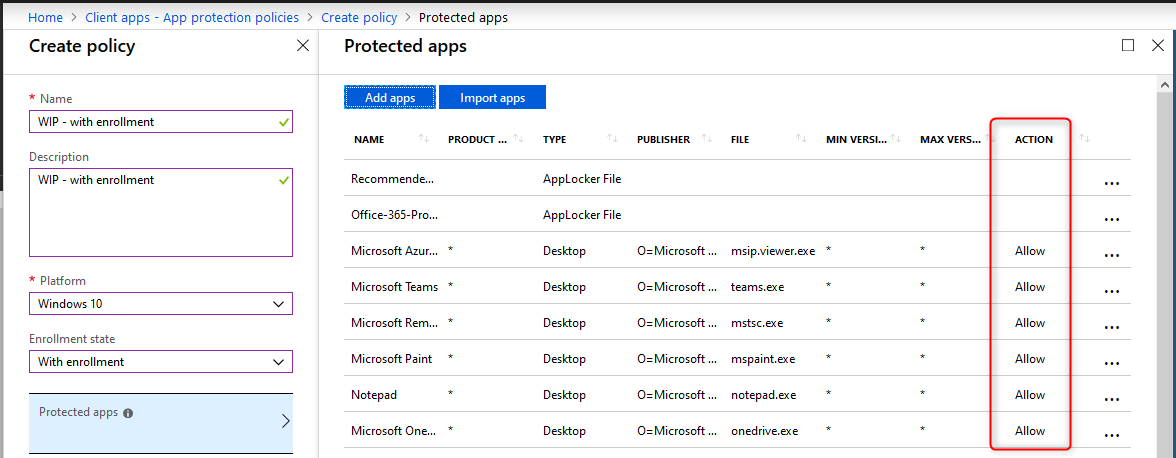
- On the protected apps blade, click on OK at the bottom of the page.
Note: There is no need to add all of the Office 365 Pro Plus suite applications manually to this list. Read more here. 
Microsoft helps by adding the “Office-365-ProPlus-1810-Allowed.xml” applocker file when you add recommended apps. Download the XML file from the above link, to have a look at the code if you like.
- Back on the Create policy blade, click on Configure required settings
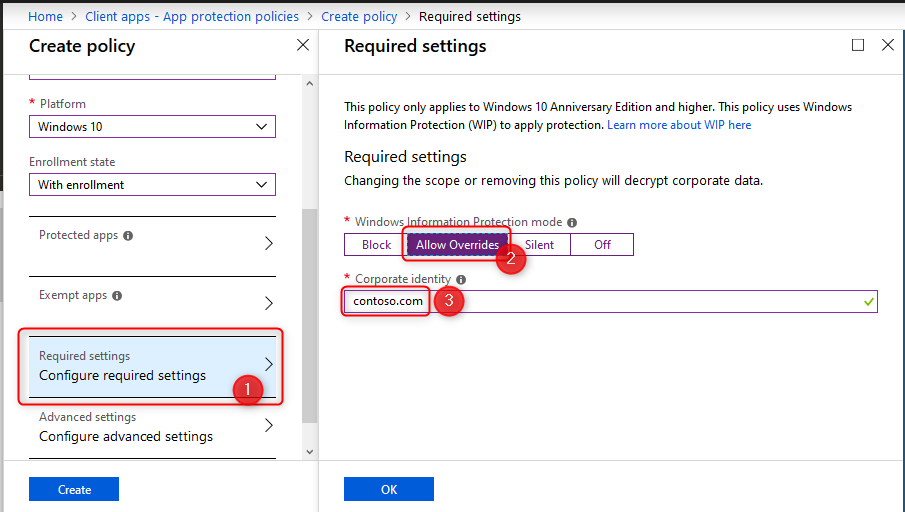
Configure required settings
For the required settings you will need to set the protection mode, and your corporate identity.
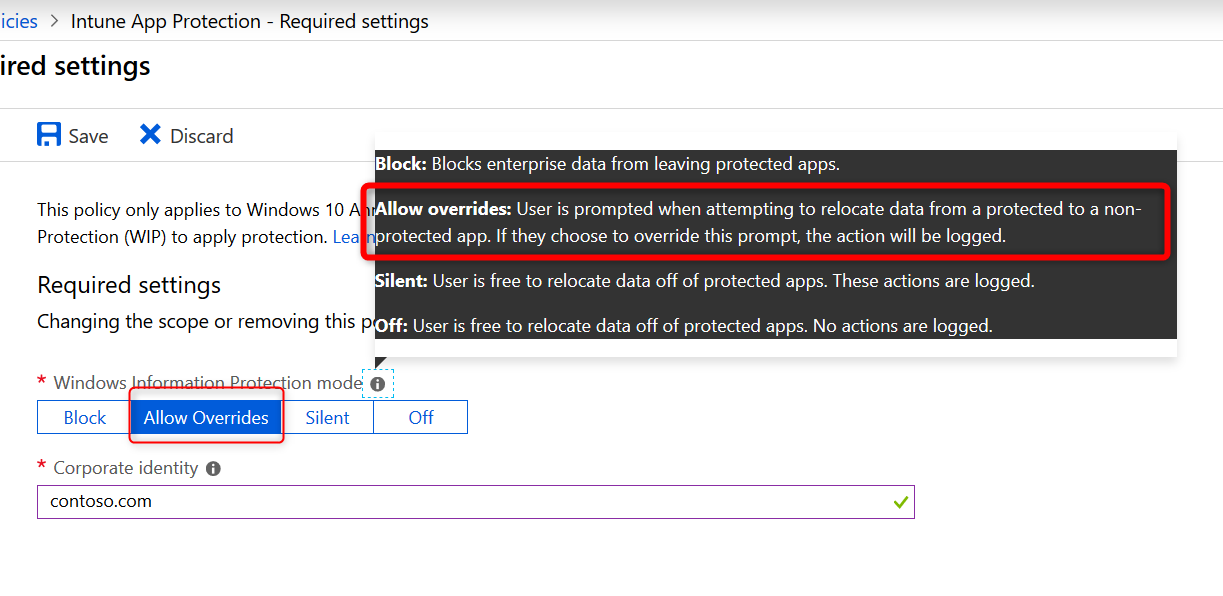
Windows Information Protection Modes
For the remainder of this post I will assume you have set the Windows Information Protection mode to Allow Overrides. Have a look at the Microsoft documentation for a complete description of all modes.
- Block: Blocks enterprise data from leaving protected apps
- Allow overrides: User is prompted when attempting to relocate data from a protected to a non-protected app.
- Silent: User is free to relocate data off of protected apps.
- Off: User is free to relocate data off of protected apps.
Note: The Off mode is not recommended. It’s best to start with Silent and from there update to Allow Override or Block.
- Select Allow Overrides and continue with setting your corporate identity
 The corporate identity field should contain only your primary domain. Add additional domains as ‘Protected domains’ under the ‘Network perimeter’ in the ‘Advanced settings’ tab. The corporate identity field is auto-defined so check it and if it’s not correct, change it and click on Save to close the Required Settings blade.
WIP Learning Mode
When you first start with Windows Information Protection and don’t know if the recommended apps will be enough, consider starting with the Protection Mode set to Silent.
WIP Learning mode essentially monitors all applications that access corporate data. Because in silent mode WIP will not block any action but will log inappropriate data sharing, giving you the opportunity to monitor your WIP enabled apps but also apps you did not add to your WIP policy.
I will write about setting up and configuring WIP Learning Mode if you want to explore that path first, but that is for another post. It will explain how to setup Device Health and where to find the WIP learning app reports you can use to fine-tune your WIP policies.
Windows Information Protection Network boundary
Corporate cloud resources are identified by configuring WIP network boundaries and help protect corporate data by encrypting data that is downloaded from there to devices. In the next section you will add your network boundaries. The Cloud resource SharePoint is added by default. 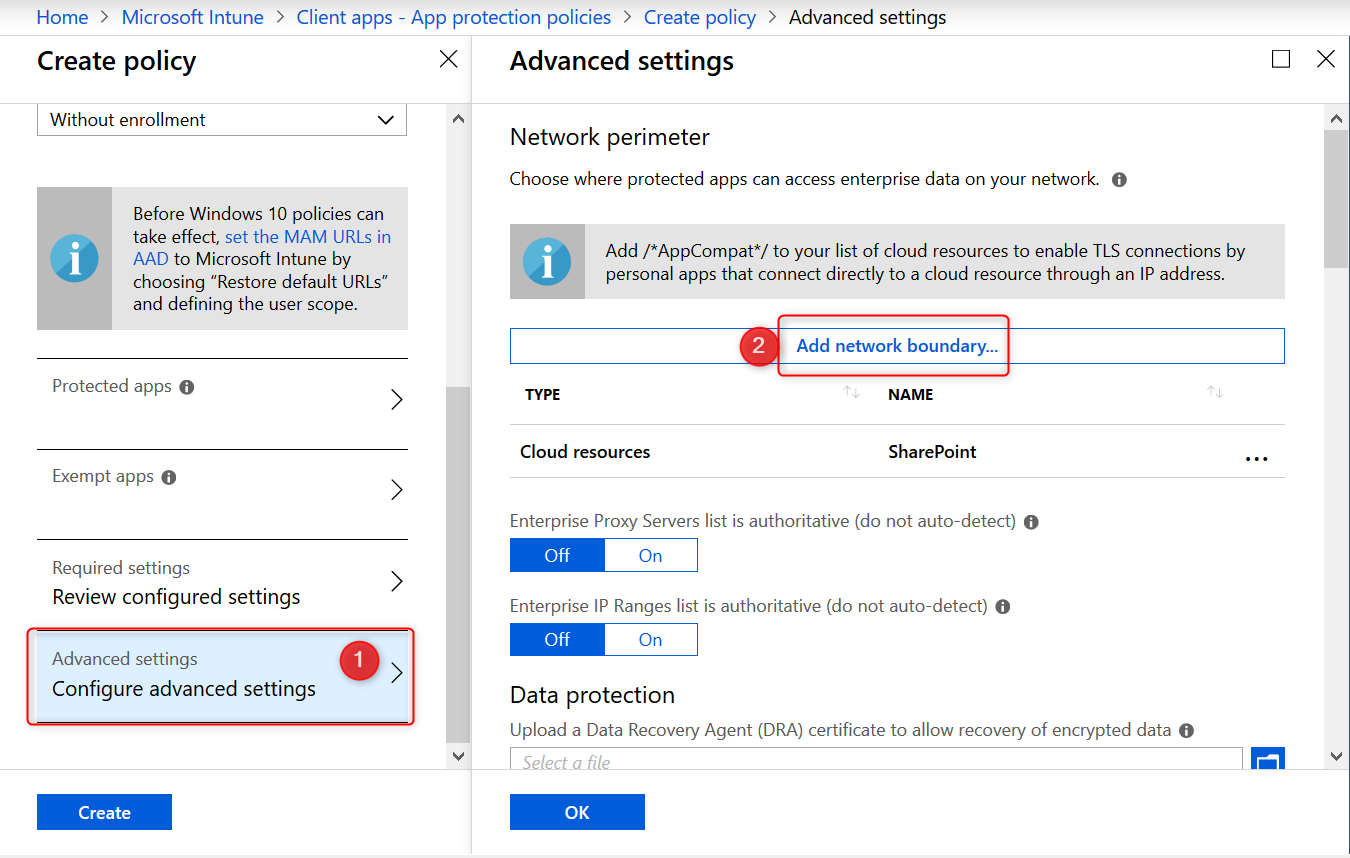
Have a look at the table below to get you started or check out the Microsoft documentation.
| Type | Name | Value |
| Cloud Resources | Office 365 | portal.office.com|tasks.office.com|protection.office.com|meet.lync.com|teams.microsoft.com |
| Cloud Resources | Outlook Online | outlook.office.com|outlook.office365.com |
| Cloud Resources | AppCompat | /*AppCompat*/ |
| Cloud Resources | SharePoint | contoso.sharepoint.com| contoso -my.sharepoint.com| contoso -files.sharepoint.com |
| Neutral Resources | Neutral | login.windows.net,login.microsoftonline.com |
After adding your Cloud Resources the configuration should look like this: 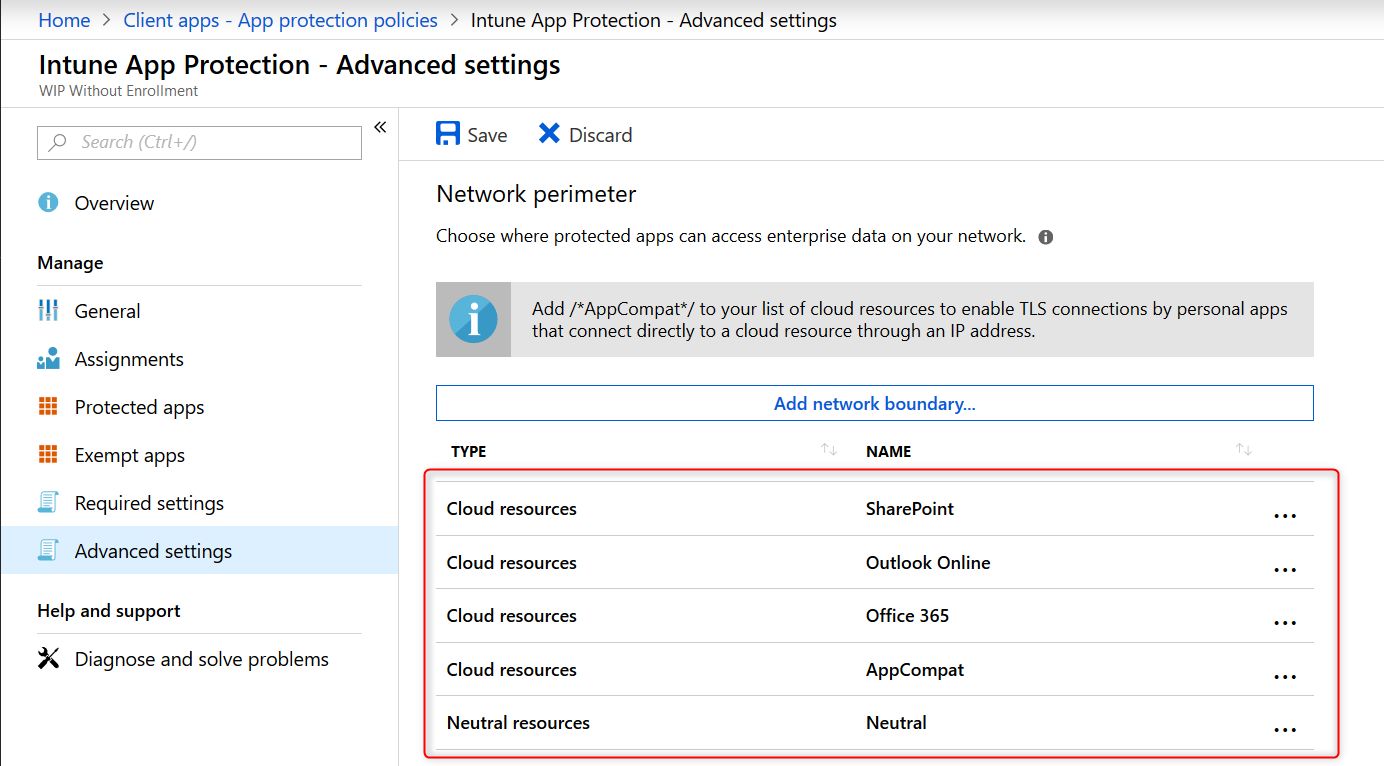
Note: Have a look at this /*AppCompat*/ notification: 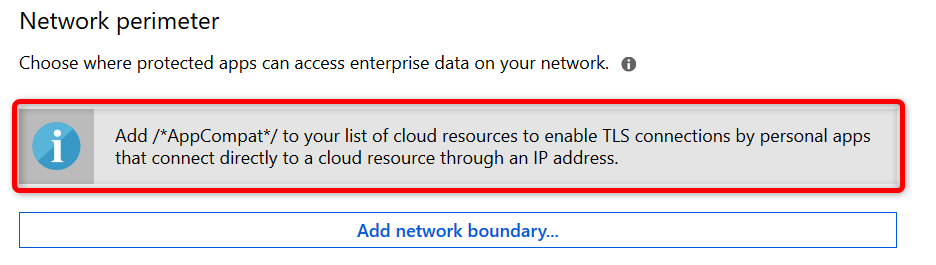
When I started testing I missed this notification and later found that I could not use browsers like Chrome or FireFox. They would simply not load any internet page. I could use 3rd party browsers after adding /*AppCompat*/ to my cloud resources.
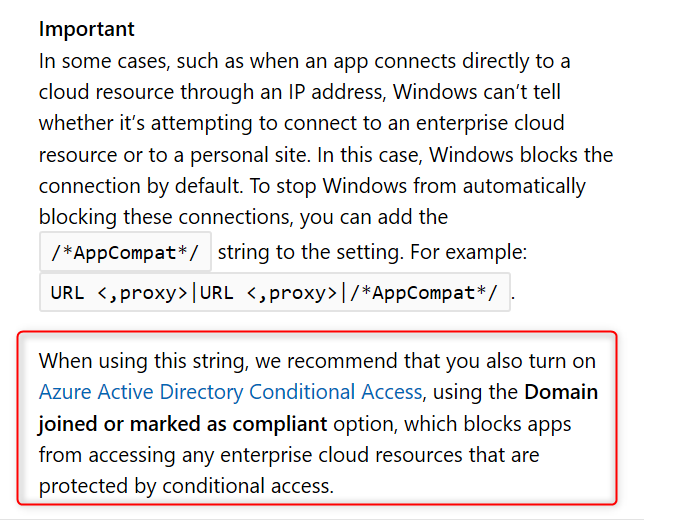
When an unenlightened app tries to connect to a cloud resource through an IP and Windows can’t determine whether to allow the app to connect, it will automatically block the connection. Read this Microsoft document a few times and you will understand Here is a another important piece of information from the Microsoft blog post:
Note: I’ll write another post about troubleshooting WIP. There are some important limitations and considerations you need to be aware of when configuring the Network boundaries. I’ve found some undocumented domains you might want to add to your Cloud Resources list to make WIP even more secure, but for now suggest you start with a pilot and test everything you can, before you deploy WIP company wide.
Other settings to configure on the advanced settings blade
Data Protection
The tool-tips tells us and I quote;
“A recovery certificate is a special Encrypting File System (EFS) certificate you can use to recover encrypted files if your encryption key is lost or damaged. You need to create the recovery certificate, and specify it here. More information is here “

Using a DRA certificate isn’t mandatory. However, Microsoft strongly recommends using it.
Set up Azure Rights Management with WIP
WIP can integrate with Microsoft Azure Rights Management to enable secure sharing of files when users want to use removable drives such as USB drives. For this to work , you must already have Azure Rights Management set up. This feature works great and enables your users to share files among each other by encrypting files that are saved to USB with Azure Rights Management (Azure RMS). Azure RMS is the protection technology used by Azure Information Protection (AIP)

For now you will have to do with the official Microsoft documentation but I will be writing another dedicated blog post in this series on setting up and configuring Azure Rights Management with WIP.
- On the Advanced settings blade, click on OK at the bottom of the page.
- Back on the Create Policy blade, click on Create to wrap it up
Piloting and deploying WIP
Deploy your newly create WIP policy to a pilot group of users.
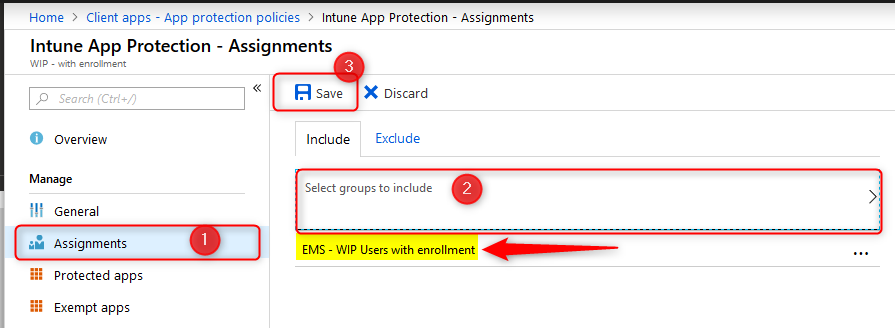
Once you’ve deployed a WIP policy, they will be applied the next time devices sync with Intune. Depending on you configuration the user experience can be different. Assuming you’ve set your protection mode to “Allow overrides” users will get notified when the mix corporate and private workspace and data. This protection mode will also audit when users change file ownership from corporate to private.
I will write another dedicated blog posts in this series on user experience with WIP and monitoring. Come back again or follow me on twitter to get notified.
Monitoring Deployment status
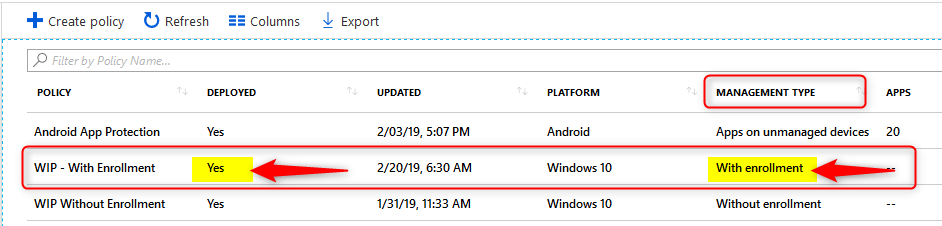
When you are piloting WIP policies, you’ll most likely have test devices at hand where you can immediately see the effect of your policies, once the device is in sync with Microsoft Intune. You can also monitor and report about your policies and their deployment status from Azure.
- Sign in to the Azure portal and Choose All Services > Intune.
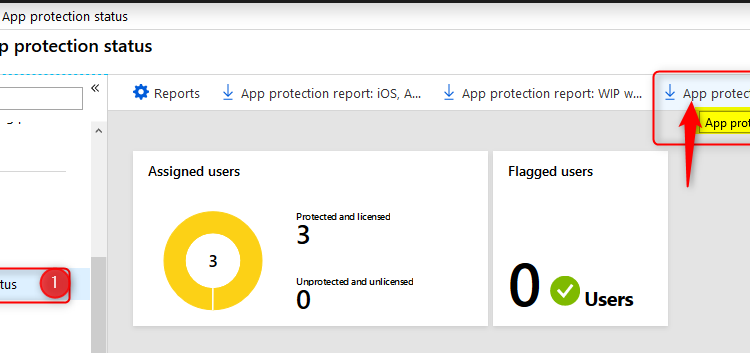
- Select Client apps > App protection status
- Download the report you want
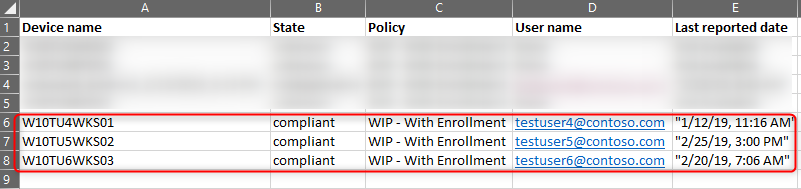
- App Protection Report: WIP via MDM
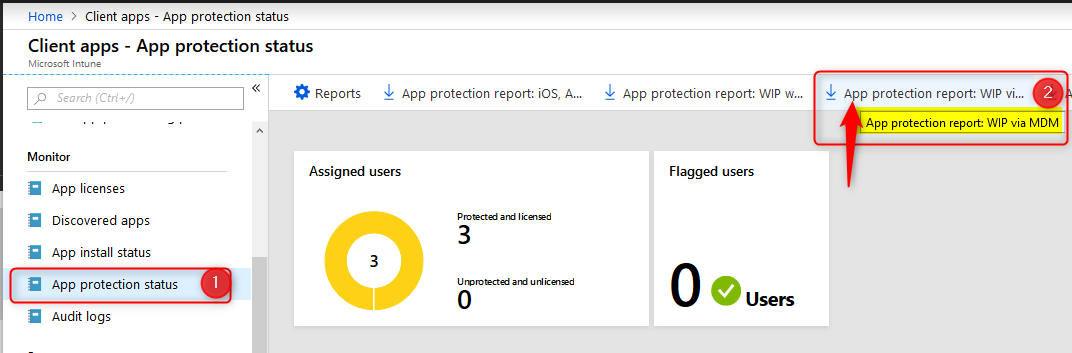
The reports contain information about the user and device name but also the App Protection Policy that applied to the user. The example below shows testuser6 has 2 BYO devices where data is managed and protected with the “WIP Without Enrollment” policy.
Conclusion
Windows Information Protection with enrollment provides a robust solution by protecting work data that is downloaded to Windows 10 devices. It works by separating personal and work data, thus helping prevent unintentional information sharing. Combined with AIP it adds an extra layer of security making it possible for your users to share data amongst each other. For example on a USB drive.
As with other methods used to protect information and devices, you need to find a good balance between security and business productivity. If users really set their mind on stealing information, they will find a way to do so, no matter what you do. Lucky for us admins, most users don’t have malicious intent.
Please check the official Microsoft documentation as they are very complete and probably will update their documentation more frequently. Most importantly, this post (and any other) is based on my own experiences in the field deploying and configuring Microsoft solutions.I hope you have found this blog interesting and of added value considering there are so many other bloggers writing about Microsoft solutions. If you have any feedback I would appreciate it if you would write a line or two.
Thank you for all of your time on these posts. Any chance of publishing the remaining posts in this series? Looks like the posts that come after this one are unpublished.
Hi Brian, I really feel bad about not beeing able to finish this series but I managed to free up some time for the next few months so I’ll be starting next week with the rest of the series. I appreciate your kind words! Hope you’ll understand.
Hey Oktay, the assignment for WIP with Enrollment has to be done for devices (group of devices) not for users, am I wrong?
Do you have any other experiences with additional network boundaries?
Again, nice blog post! 🙂
Hi Stephan, You can assign to a usergroup. That makes it a lot easier to manage. Sometimes users have more than one device and by targeting users you’ll cover them all. Dynamic device groups should also work but I haven’t tested that. What kind of boundaries are you looking for?
[…] Windows Information Protection with Enrollment […]
[…] Windows Information Protection with Enrollment […]
Octay, very helpful as always ! thank you !
Thank you! 🙂
Thanks you for these posts, I apply the WIP policy for both enrollment and without enrollment. I facing some issue
– when users download multiple file from one drive the protection dose not apply
– when I try to download from excel or PowerPoint online also the protection dose not apply and I seeing the download URL is : euc-powerpoint.officeapps.live.com
euc-excel.officeapps.live.com
do you have any advice?
Hi Tareq, I planned on releasing a WIP BYOD user scenario blog today or tomorrow (trying to finish it today) and a troubleshoot blog next week. To solve your problem you should add those download URL’s as a cloud resource to the network boundaries you already have configured. Just add a new Cloud resource and name it something like “MS Custom Download locations”.
The download URL’s may be different depending on your geographical location. I personally added the following URL’s northeurope1-mediap.svc.ms|northeurope1-mediap.svc.ms|euc-word-edit.officeapps.live.com|euc-excel.officeapps.live.com|euc-powerpoint.officeapps.live.com
Thank you a lot for this article and actually the entire series of articles that you are publishing. I’m facing the following issue in an environment that has the following configuration: Intune-SCCM Comanagement is configured and Hybrid AzureAD Join is configured in AAD Connect for all Windows 10 devices. Automatic device registration in AzureAD and automatic MDM enrollment are configured. All workloads from SCCM for a Pilot group are transferred to Intune. In Azure AD in the Mobility (MDM and MAM) a group of test users is assigned for both the MDM and the MAM scope. As far as I… Read more »
Hi Benin, Just checking to make sure…Did you set the Windows Information Protection Mode to allow overrides or Silent? I haven’t seen this issue myself but will try to find out more about it. You probably already know but for Intune the following eventlogs might help you further troubleshoot the issue: Microsoft-Windows-DeviceManagement-Enterprise-Diagnostics-Provider/ – Admin – Debug – Operational Also…Did you check the the Enterprise Context in task manager? If nothing else works. Just set the Windows Information Protection Mode to Off and see if you still have the same issues. I’m very curious to know more about this issue. Do… Read more »
Thanks a lot of explaining the WIP, just i was wondering what or when to use each boundary Type, as some are really confusing.
What if users need to upload work file to some sites, not related directly with O365 services such governmental site, where should i add the site url.
Hi Silvio, Add work-only or Enterprise apps/URL’s to Enterprise cloud resources. These URL’s will be subject to WIP and only an ‘enlightended’ app like the EDGE browser will be able to access corp data. Neutral resources are sites/URL’s that can used for both personal and work. both ‘enlightended’ and ‘unenlightended’ app can access URS’s specified under Neutral resources. So both EDGE and Chrome will be able to access the URL. If the governmental site can be used for both personal and corporate then add it to Neutral resources. If the URL is only to be used for business purposes, then… Read more »
Thanks Oktay?, I got the point, just 2 more question, do you know where i can find detailed information about Network Boundary types.
2nd question is, i have configured NETWORK DOMAINS so users can save and transfer files on local network where we do still have some servers and shared folders, and placing only domain name under protected domains, is that correct?
Hi Oktay, Thanks for the insightful tutorial they definitely got me started and deploying Intune both MAM and MDM. I have not configure a test domain in Hybrid Azure AD mode, all SharePoint access to Office files it fine and they all display the briefcase. I have added our local AD server IP address and our local domain to the network boundaries. When I try to access any office file on the network share, I receive an error of “you cannot open \\filerserver\file.xlsx”, but I can open a notepad file from the same network share. How do iset WIP to open… Read more »
[…] Windows Information Protection with Enrollment […]
[…] Windows Information Protection with Enrollment […]
[…] a look at my previous post about how to create a WIP policy and add apps to your […]
[…] consider when you start troubleshooting Windows Information Protection (WIP). For enrolled devices (Windows Information Protection With Enrollment) you have more options, logging and control than for devices that are not MDM enrolled. (WIP-WE). […]
[…] Windows Information Protection with Enrollment […]
Hi Oktay,
Thanks for the posts, really helpful for beginners like me working in SMB organizations to implement Intune.
I have a question. With Microsoft deprecating WIP without enrollment, can we still implement WIP with enrollment and achieve the results with App Protection Policies where files downloaded from Outlook/SharePoint/OneDrive will be marked with corporate identity and cant be copied to unmanaged apps? Sorry for a basic question, but I’m trying to get my head around with these changes.