Last Updated on October 4, 2022 by Oktay Sari
July 2022
IMPORTANT UPDATE: Microsoft announced the sunset for Windows Information Protection! WIP will be discontinued over time. Support for Windows Information Protection Without Enrollment will end by the end of calendar year 2022. Please read the official announcement and more on the following 2 sites:
- Announcing the sunset of Windows Information Protection (WIP)
- Support tip: End of support guidance for Windows Information Protection
If you have plans to implement WIP, I suggest you rethink your strategy accordingly. I will follow-up on this and update the WIP posts I have when more information is released by Microsoft.
Please read about the basics of Windows Information Protection in my previous blog. First of all WIP Without Enrollment is a great solution for organizations supporting a BYOD solution but at the same time, want to manage the corporate applications and data securely.
As always, I ask you to also check the official Microsoft documentation as they are very complete and probably will update their documentation more frequently. Most importantly, this post (and any other) is based on my own experiences in the field deploying and configuring Microsoft solutions.
This post is part of a series. In upcoming post I’ll write about Microsoft Cloud App Security, Limiting Access to Exchange Online or SharePoint on unmanaged devices. Combining the power of these tools, will give you a nice solution to enable a bring-your-own-device scenario.
- Introduction to Windows Information Protection
- Configuring MDM user scope and MAM user scope
- Windows Information Protection without enrollment (WIP-WE / MAM) (this post)
- Windows Information Protection with Enrollment
- Windows Information Protection User Experience
- WIP-WE User Experience – WIP Without MDM enrollment
- Set up Azure Rights Management for WIP
- WIP Without Enrollment Selective Wipe
- Troubleshooting Windows Information Protection
- Monitoring and collecting WIP audit event logs
- WIP Learning mode
- Support Windows 10 BYOD with Microsoft Endpoint Manager and WIP-WE
Prerequisites
Make sure you have all the prerequisites in place;
- Intune enabled as the MDM authority
- Windows 10 1703 and above (Pro, Enterprise, Education)
- EMS E3 licenses (or at the very least Intune and Azure AD premium P1)
- Configure your MAM provider in Azure AD for WIP without enrollment
Configuring your MAM provider
Before you create your WIP-WE policy, you need to set up your MAM provider or the MAM URLs in Azure AD. Configure the MAM Discovery URL to enable WIP-WE for Windows 10 devices . Without it the users cannot enroll into WIP-WE (MAM) management.
I dedicated another blog post on configuring MDM users scope and MAM user scope. Therefore, read that post if you want to learn more about configuring MDM and MAM scopes. If you already configured the MAM provider continue reading.
Creating a WIP Protection Policy
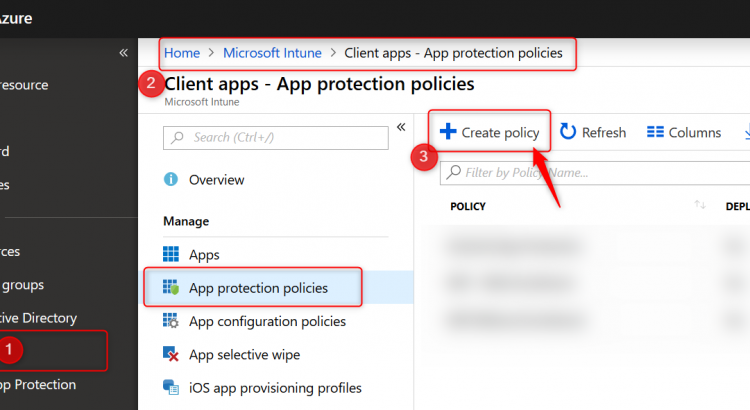
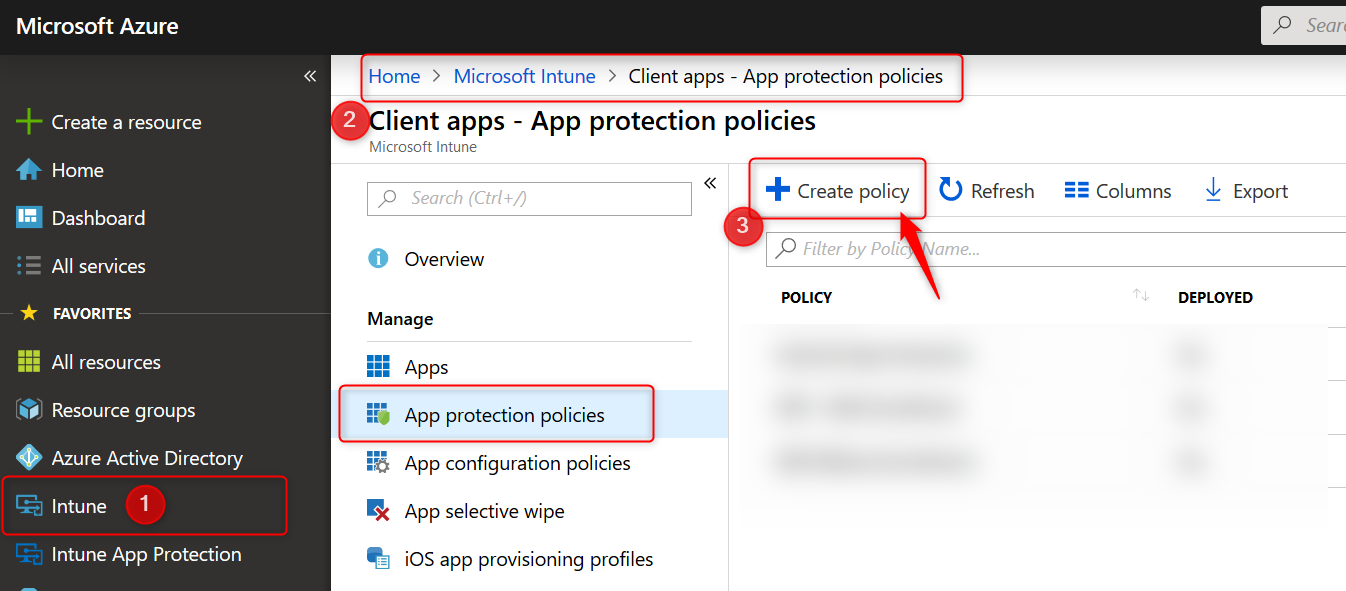
- Sign in to the Azure portal and Choose All Services > Intune.
- Select Client apps > App protection policies
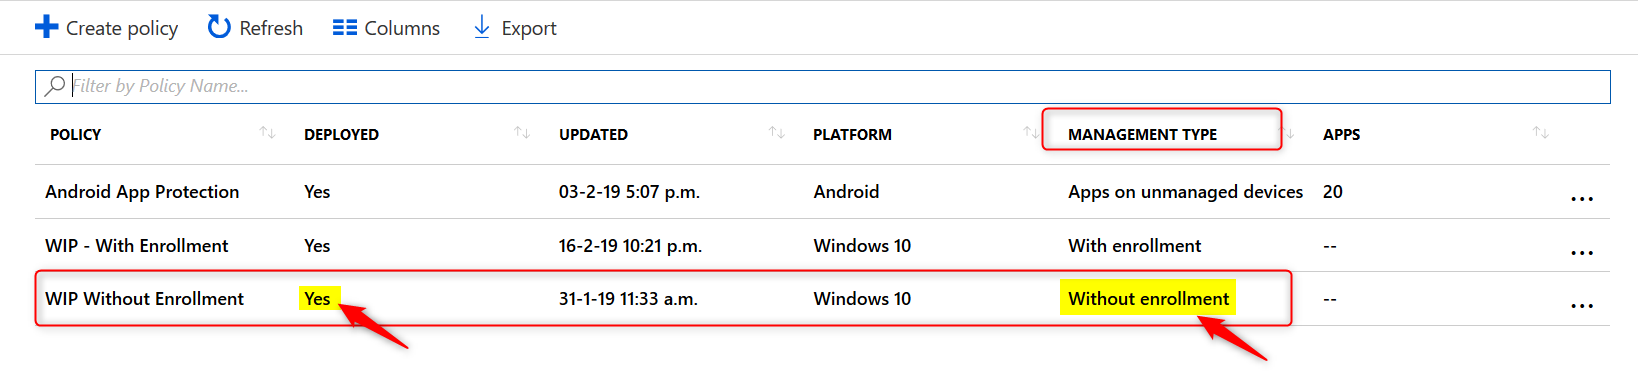
- Click on Create policy to create your WIP protection policy
- Give the policy a name and a description. Choose Windows 10 as the platform from the drop-down menu.
- Finally select the Enrollment state. In this case we are creating a WIP policy for unmanaged BYO devices. That is why I choose “without enrollment”
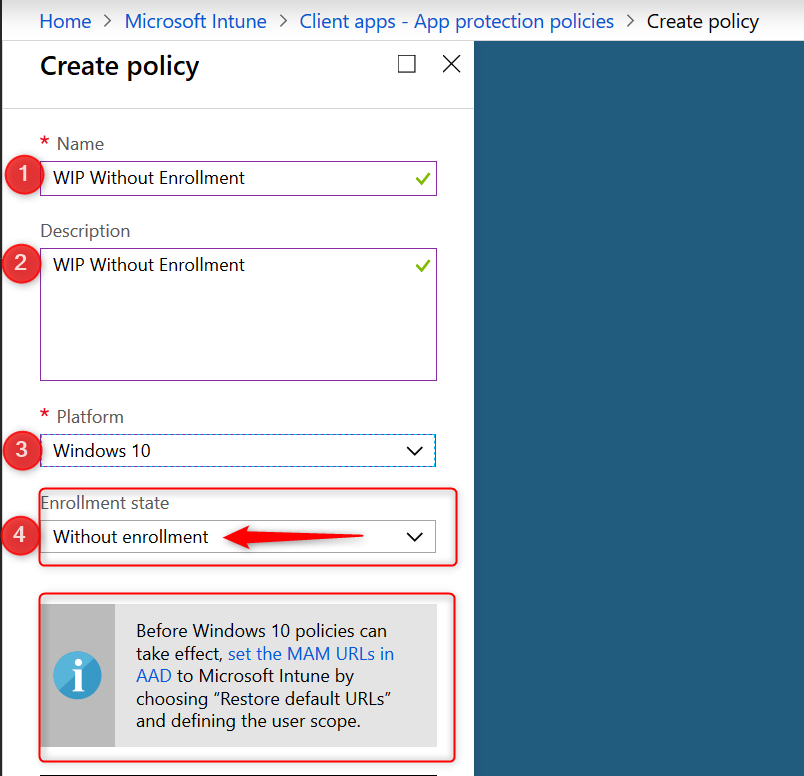
Please note the warning about configuring the MAM URLs in AAD.
Adding apps to your WIP Policy
In the next section you will select apps you want to allow or deny access to your corporate data. There are two kinds of applications you need to know about; Enlightened applications (MAM aware) and Unenlightened (MAM Unaware) applications. The difference is that enlightened apps can differentiate between corporate and personal data whereas unenlightened apps cannot. Read my previous post about WIP Basics to fully understand the solution. Also read the Microsoft blog for more information about configuring WIP policies and adding apps to your WIP policy.
- When you are ready to continue, click on Protected apps and then click on Add apps
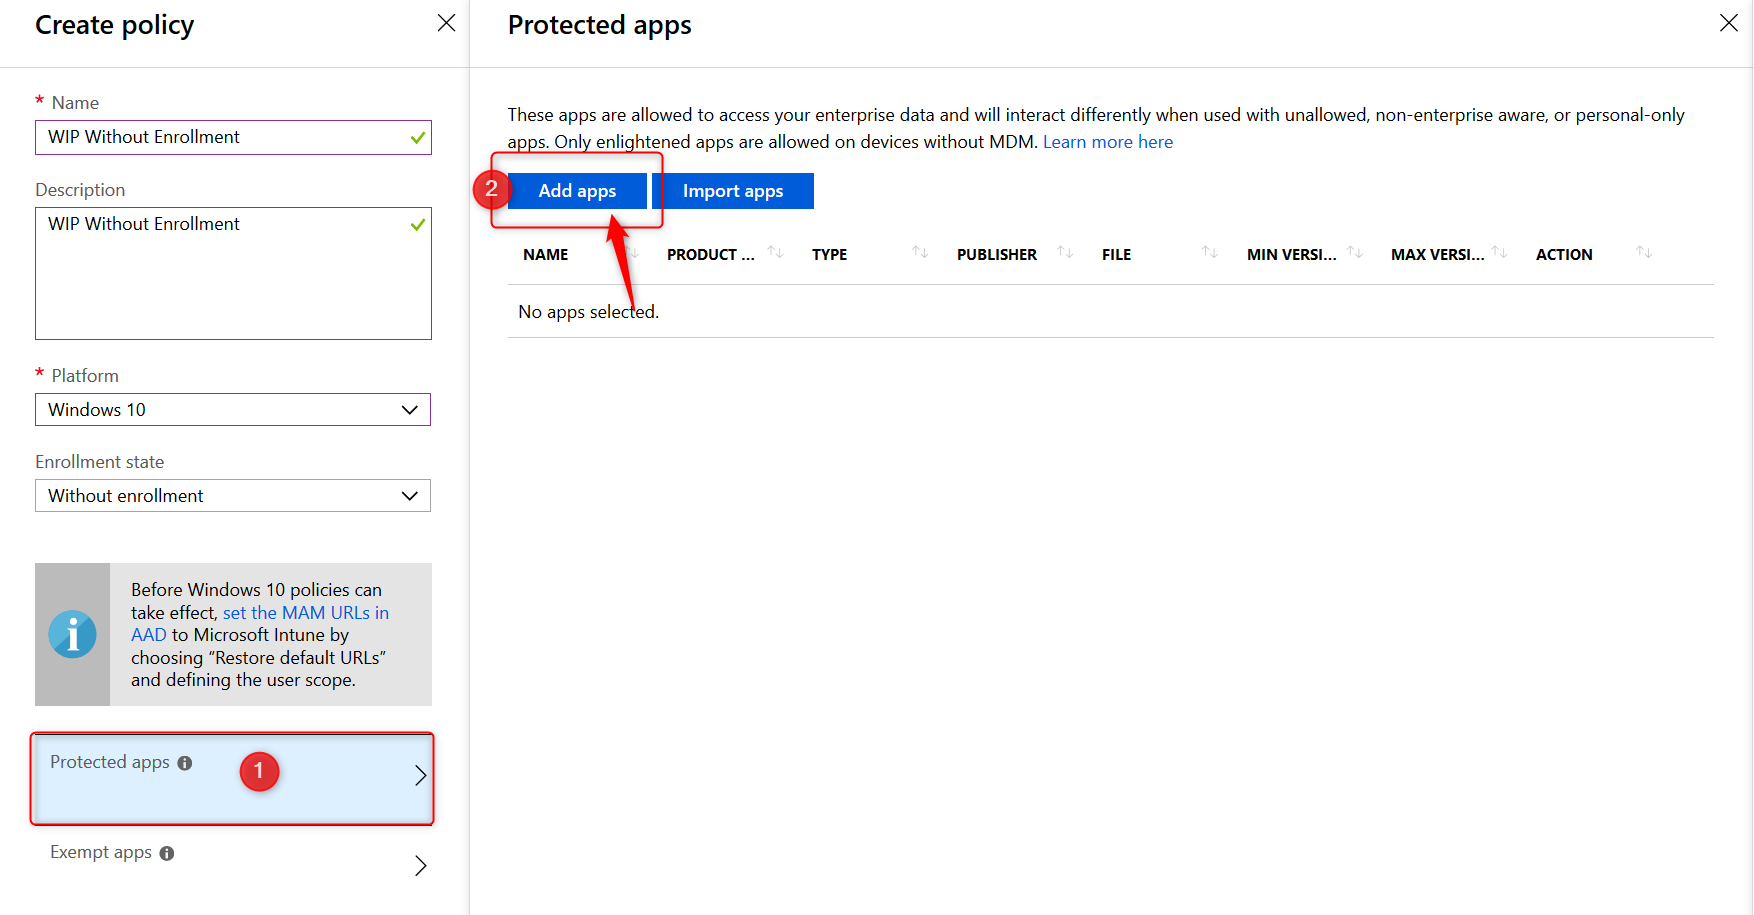
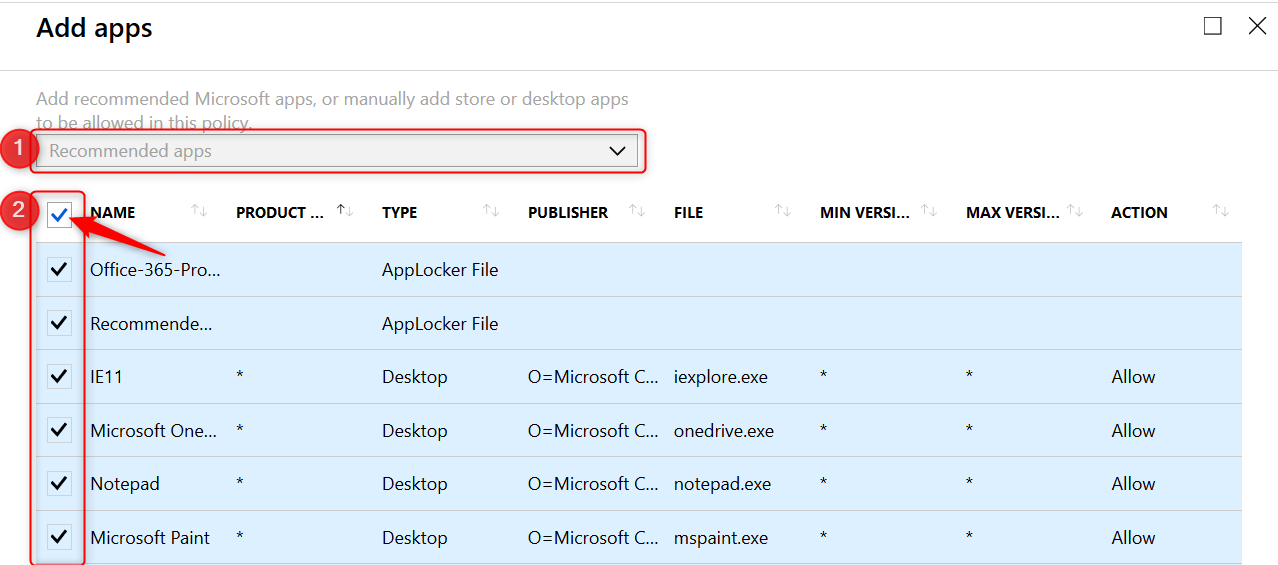
- On the Add apps blade choose Recommended apps from the drop-down menu.
- Click on the select box next to NAME (See the arrow below). This will select all the recommended applications in the list.
- All applications are allowed by default when you add them to your protected apps list. Make changes here before you continue
- click on OK at the bottom of the page.
Back the Protected apps blade. Have a look at the Action column where you can see which applications are allowed or denied access.

- On the protected apps blade, click on OK at the bottom of the page.
Note: There is no need to add all of the Office 365 Pro Plus suite applications manually to this list. Read more here.

Microsoft helps by adding the “Office-365-ProPlus-1810-Allowed.xml” applocker file when you add recommended apps. Download the XML file from the above link or here, to have a look at the code if you like.
- Back on the Create policy blade, click on Configure required settings
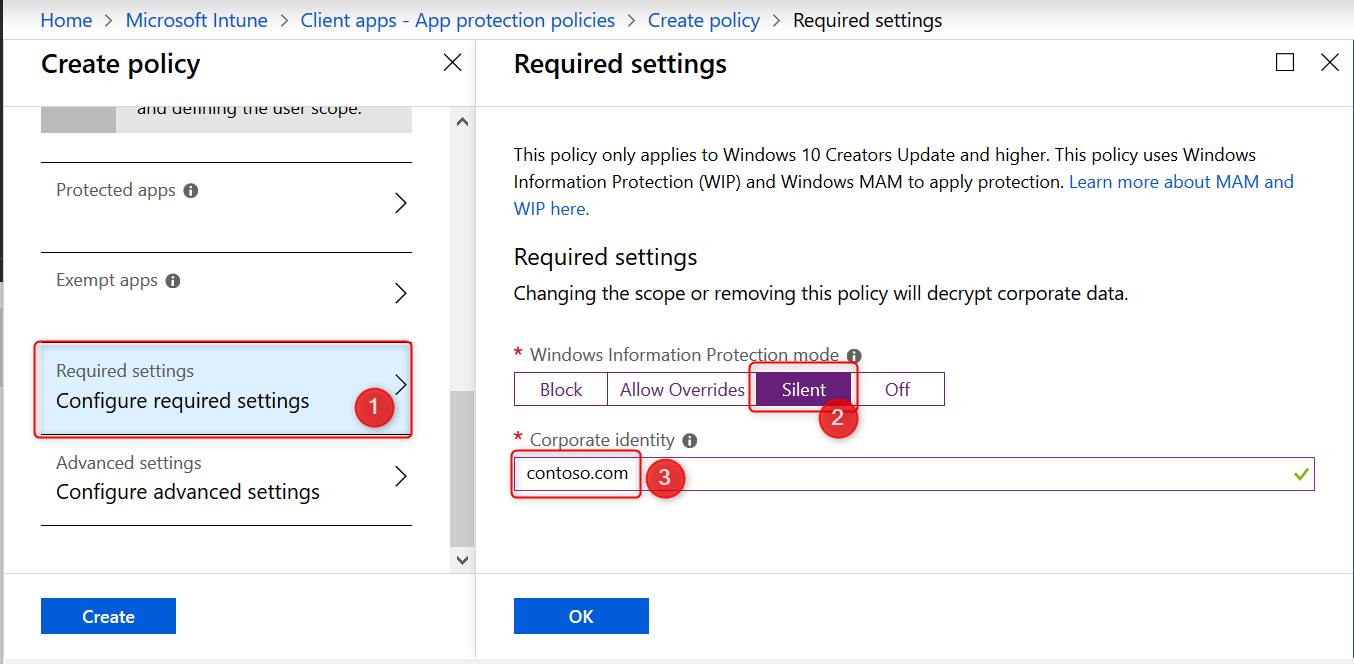
Configure required settings
This policy only applies to Windows 10 Creators Update and higher. For the required settings you will need to set the protection mode, and your corporate identity.
Windows Information Protection Modes
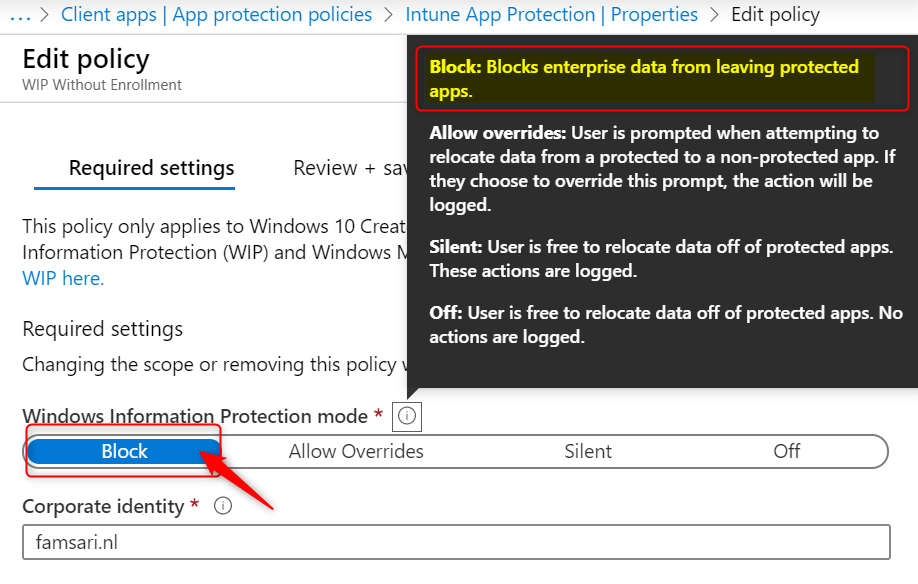
For the remainder of this post I will assume you have set the Windows Information Protection mode to Block. Have a look at the Microsoft documentation for a complete description of all modes.
- Block: Blocks enterprise data from leaving protected apps
- Allow overrides: User is prompted when attempting to relocate data from a protected to a non-protected app.
- Silent: User is free to relocate data off of protected apps.
- Off: User is free to relocate data off of protected apps.
Note: The Off mode is not recommended. It’s best to start with Silent and from there work your way to Block.
- Select Block and continue with setting your corporate identity
The corporate identity field should contain only your primary domain. Add additional domains as ‘Protected domains’ under the ‘Network perimeter’ in the ‘Advanced settings’ tab. The corporate identity field is auto-defined. If it’s not correct, change it and click on Save to close the Required Settings blade.
IMPORTANT: Unlike Azure AD Joined and MDM enrolled devices, you have a lot less control over personal devices that are only Azure AD registered and not MDM enrolled.
If you do not set your WIP protection mode to block, users are allowed to change file ownership and decrypt files. When users change file ownership from work to personal, the action is written to the local event log but you cannot collect event log entries to Azure Log Analytics. For this to work, you need the Microsoft Monitoring Agent installed on the device. And since deploying apps to Windows 10 requires a device to be MDM enrolled, you don’t have a lot of other options. That is why I choose to set the protection mode to block.
WIP Learning Mode
When you first start with Windows Information Protection and don’t know if the recommended apps will be enough, consider starting with the Protection Mode set to Silent.
WIP Learning mode essentially monitors all applications that access corporate data. Because in silent mode WIP will not block any action but will log inappropriate data sharing, giving you the opportunity to monitor your WIP enabled apps but also apps you did not add to your WIP policy.
I will write about setting up and configuring WIP Learning Mode if you want to explore that path first, but that is for another post. It will explain how to setup Device Health and where to find the WIP learning app reports you can use to fine-tune your WIP policies.
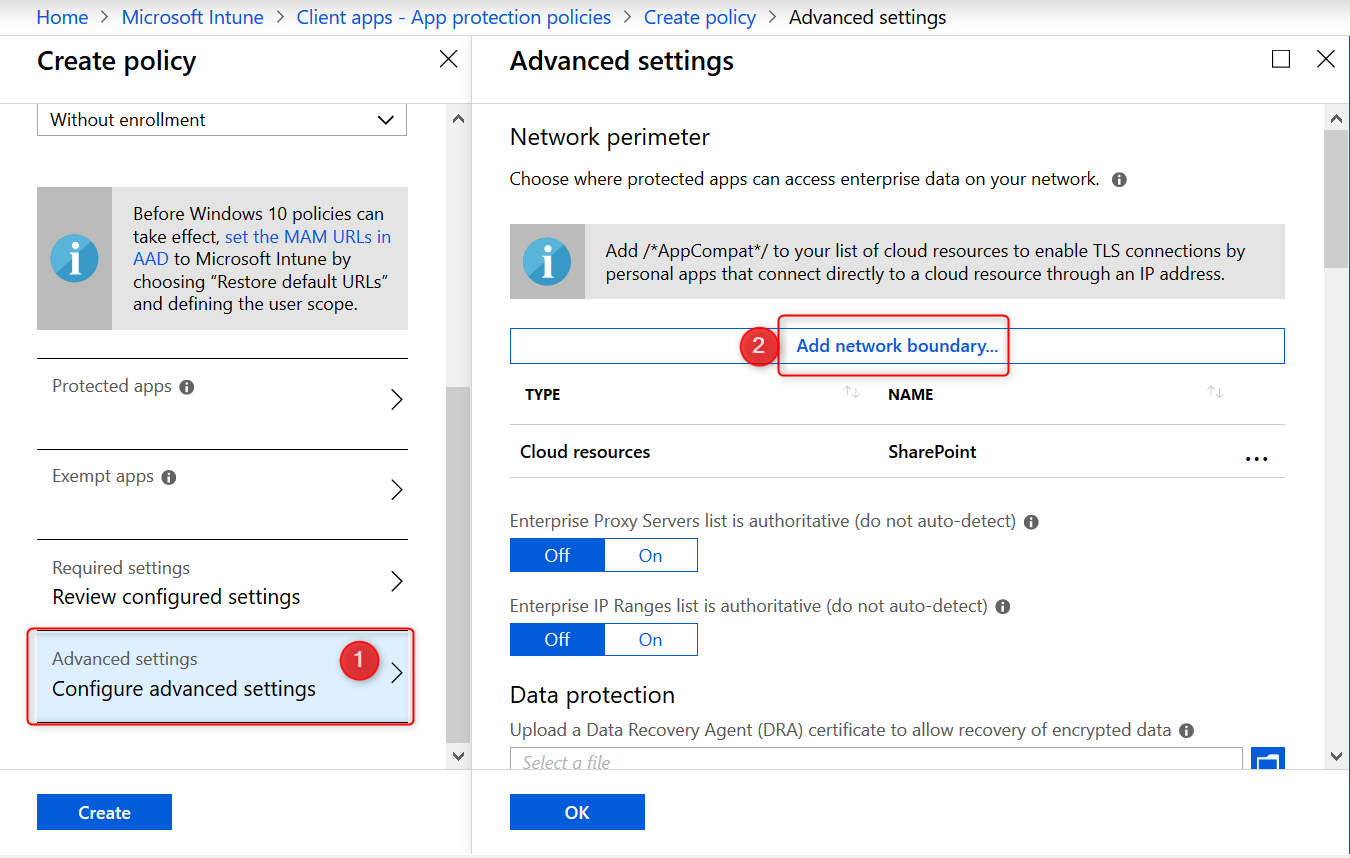
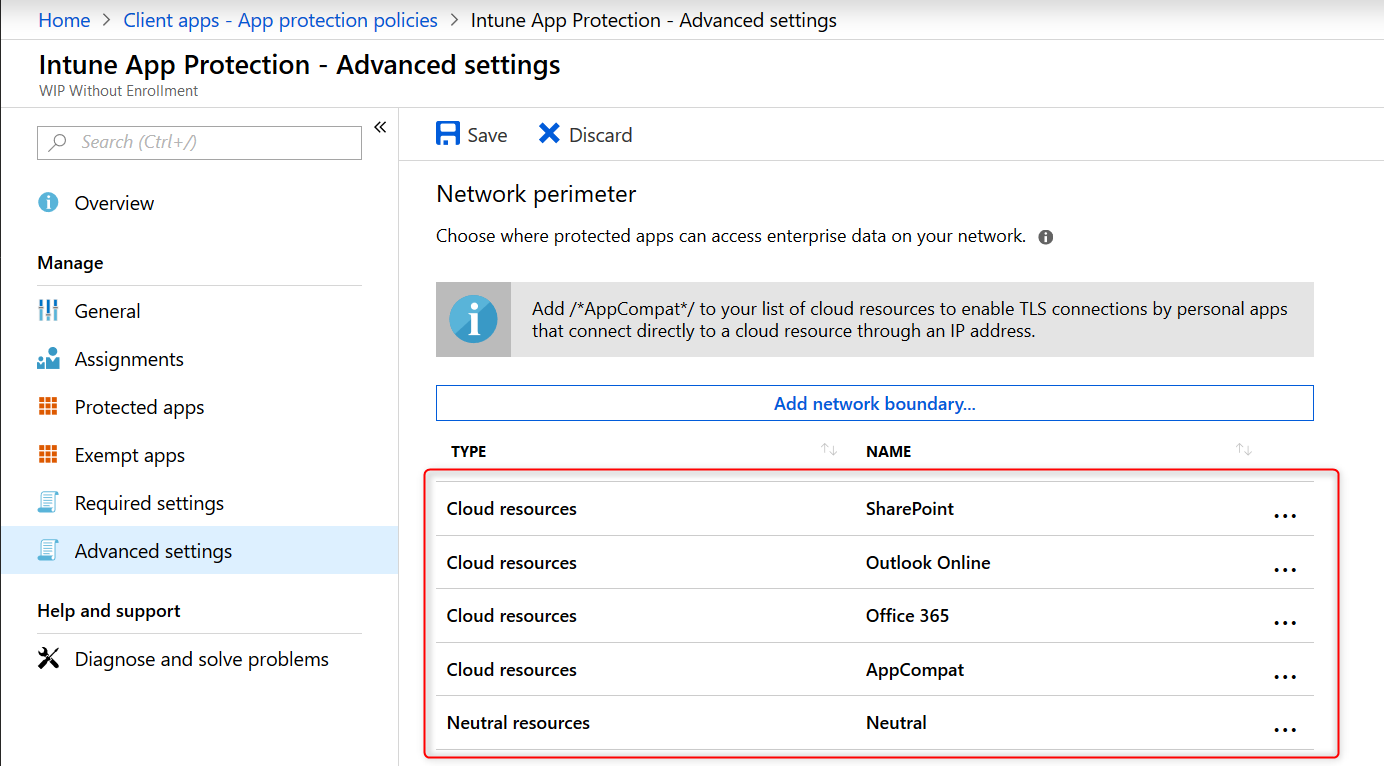
Windows Information Protection Network boundary
Identify corporate cloud resources by configuring WIP network boundaries and help protect corporate data by encrypting data that is downloaded from there to devices. In the next section you will add your network boundaries. The Cloud resource SharePoint is added by default.
Have a look at the table below to get you started or check out the Microsoft documentation for more tips.
| Type | Name | Value |
| Cloud Resources | Office 365 | portal.office.com|tasks.office.com|protection.office.com|meet.lync.com|teams.microsoft.com |
| Cloud Resources | Outlook Online | outlook.office.com|outlook.office365.com |
| Cloud Resources | AppCompat | /*AppCompat*/ |
| Cloud Resources | SharePoint | contoso.sharepoint.com| contoso-my.sharepoint.com| contoso-files.sharepoint.com |
| Neutral Resources | Neutral | login.windows.net,login.microsoftonline.com |
After adding your Cloud Resources the configuration should look like this:
 `
`
Note: Have a look at this /*AppCompat*/ notification:
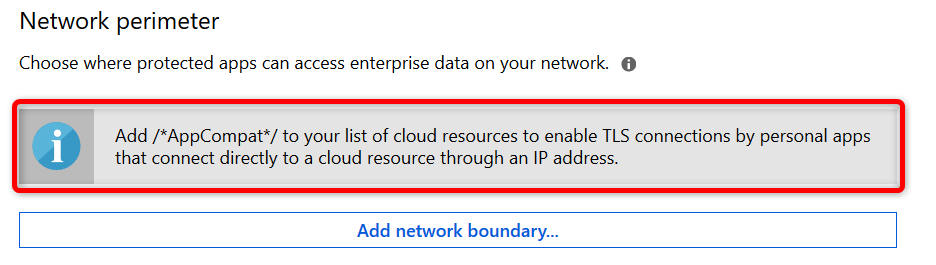
When I started testing I missed this notification and later found that I could not use browsers like Chrome or FireFox. They would simply not load any internet page. I could use 3rd party browsers after adding /*AppCompat*/ to my cloud resources.
When an unenlightened app tries to connect to a cloud resource through an IP and Windows can’t determine whether to allow the app to connect, it will automatically block the connection. Read this Microsoft document a few times and you will understand ? Here is a another important piece of information from the Microsoft blog post:
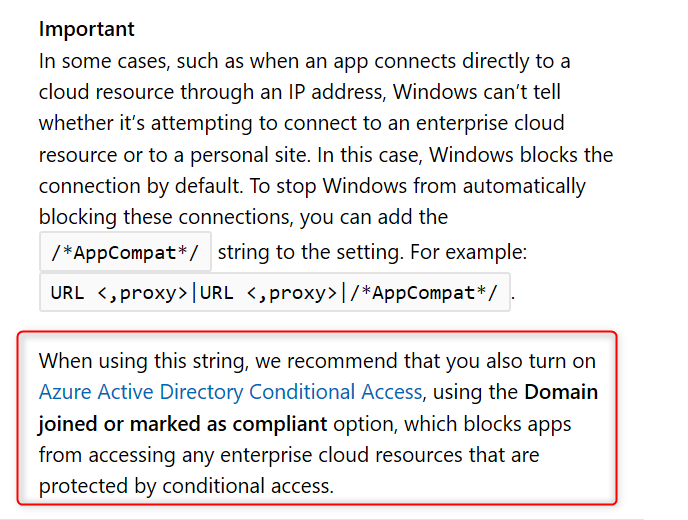
Note: I will write another blog post in this series about troubleshooting WIP and my experience from the field. There are some important limitations and considerations you need to be aware of when configuring the Network boundaries. I’ve found some undocumented domains you might want to add to your Cloud Resources list to make WIP even more secure, but for now suggest you start with a pilot and test everything you can, before you deploy WIP company wide. Come back again and read all about it soon!
Other settings to configure on the advanced settings blade
Data Protection
The tool-tips tells us and I quote;
“A recovery certificate is a special Encrypting File System (EFS) certificate you can use to recover encrypted files if your encryption key is lost or damaged. You need to create the recovery certificate, and specify it here. More information is here “

Using a DRA certificate isn’t mandatory. However, Microsoft strongly recommends using it.
Set up Azure Rights Management with WIP
WIP can integrate with Microsoft Azure Rights Management to enable secure sharing of files when users want to use removable drives such as USB drives. For this to work , you must already have Azure Rights Management set up. This feature works great and enables your users to share files among each other by encrypting files that are saved to USB with Azure Rights Management (Azure RMS). Azure RMS is the protection technology used by Azure Information Protection (AIP)

For now you will have to do with the official Microsoft documentation but I will be writing another blog post in this series on setting up and configuring Azure Rights Management with WIP.
Finish the WIP configuration policy.
- On the Advanced settings blade, click on OK at the bottom of the page.
- Back on the Create Policy blade, click on Create to wrap it up
Piloting and deploying WIP
The final step is deploying your newly create WIP policy to a pilot group of users. Just remember that MAM policies are deployed to users and not devices.

Once you’ve configured a WIP policy, they will be applied the next time devices sync with Intune. Depending on you configuration the user experience can be different. Assuming you’ve set your protection mode to “Allow overrides” users will get notified when they mix corporate and private workspace and data. This protection mode will also audit when users change file ownership from corporate to private.
I will write another dedicated blog post in this series on user experience with WIP. Come back again or follow me on twitter to get notified.
Monitoring Deployment status
When you are piloting your WIP policies, you’ll most likely have test devices at hand where you can immediately see the effect of your policies, once the device is in sync with Microsoft Intune. You can also monitor and report about your policies and their deployment status from Azure.
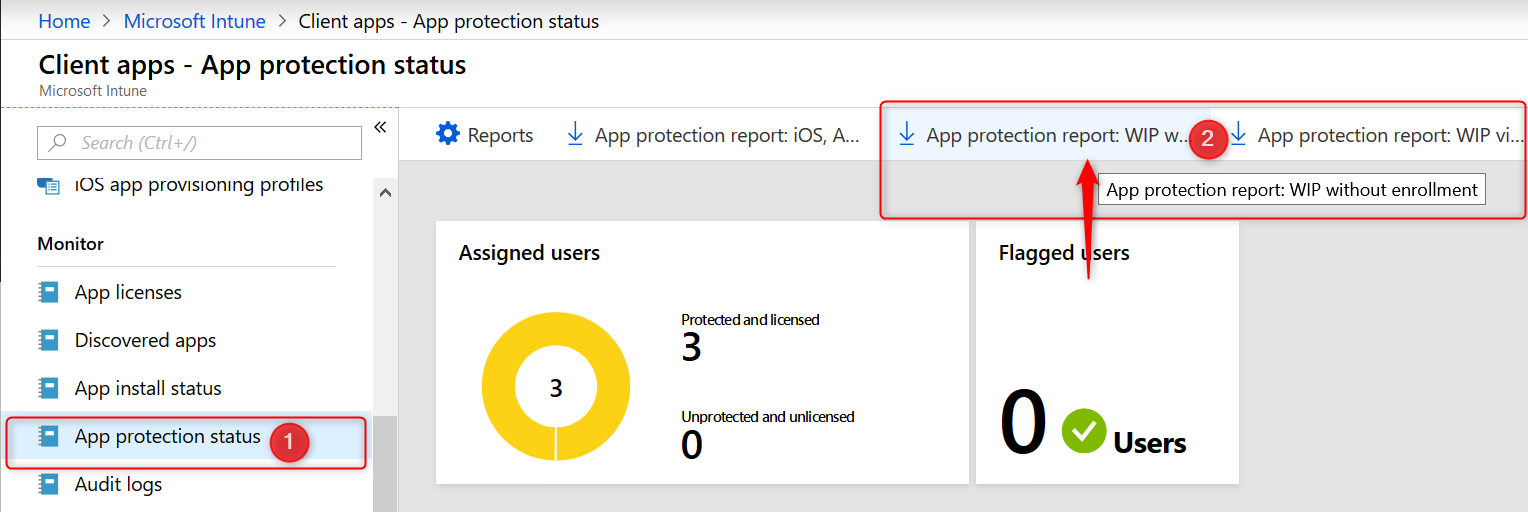
- Sign in to the Azure portal and Choose All Services > Intune.
- Select Client apps > App protection status
- Download the report you want
- App Protection Report: WIP without Enrollment
- App Protection Report: WIP via MDM
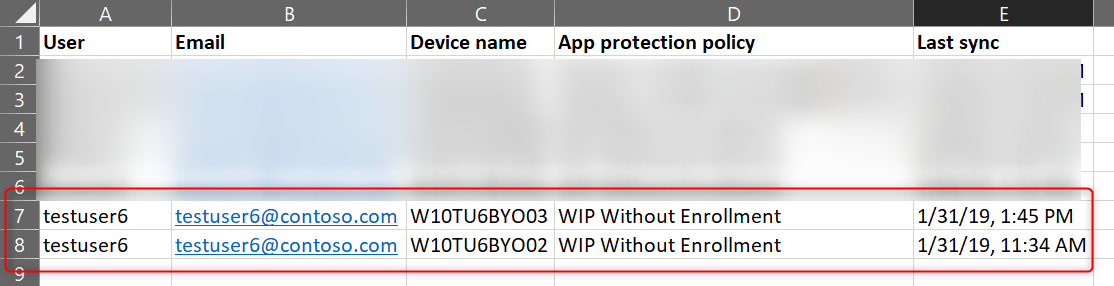
The reports contain information about the user and device name but also the App Protection Policy that applied to the user. The example below shows testuser6 has 2 BYO devices where data is managed and protected with the “WIP Without Enrollment” policy.
Conclusion
WIP provides a robust solution by protecting work data that is downloaded to Windows 10 devices. It works because it can separate personal and work data, helping prevent unintentional information sharing. This makes WIP a good choose for companies wanting to support a BYOD scenario. Combined with AIP it adds an extra layer of security making it possible for your users to share data amongst each other.
As with other methods used to protect information and devices, you need to find a good balance between security and business productivity. If users set their mind on stealing information, they will find a way. Lucky for us admins, most users don’t have malicious intent.
Sir,
I have some question hope you can and will answer.
1)Does WIP only encrypt files/data on the user device?
2)Can files also become encrypted on a file share by WIP?
3)What happens when an app is not on the allow list and tries to open/save a file on a configured Cloud Resource?
4)What happens when an un-enlighted app tries to open/save a file from a configured Cloud Resource?
5)Is it possible to add a fileshare to WIP is adding only domain name sufficient?
6)If user1 saves a WIP protected document on a fileshare can user2 open it?
Dear RKast, Thank you for your feedback and participation. Please find my answers below: 1)Does WIP only encrypt files/data on the user device? YES. WIP will only encrpt files that or stored on a user device. It will not encrypt files stored on Sharepoint or OneDrive. Only the files you download will be encrypted with EFS. 2)Can files also become encrypted on a file share by WIP? NO. You can however add a fileshare to your network boundaries. All files downloaded from the share to a device will be encrypted on the device using EFS.This config might give issues with… Read more »
Really like the blog and it’s an excellent guide – would you also use the same settings for With Enrolment as well?
Very well written post, thank you Oktay!
One question comes to my mind though, is there a way to automatically apply the policy to users that are already signed in to services? The scenario is the following: User has Outlook 2016/2019 installed on their personal laptop, then we assign the MAM-WE policy to their account. Will Outlook block their access until the Work account is added to Windows, or will Windows prompt them for that? I saw that the native Mail app has this behavior, not sure about Outlook though.
Many thanks!
Hi Oktay, Thanks for the blog. Very helpful! I’ve a question. How can we make sure all Windows 10 BYOD users are WIP (witouth enrollemnt) registered before accessing any file? When I open a Office application for the first time, it ask to register my device, but I can prevent this to choose for the option “Only this app”. When I choose this option, my device isn’t registered with Azure AD (and WIP), however, I’m able to open files from SharePoint and save these to my computer. In this way user are able to bypass WIP. I guess there is… Read more »
Hi Angelo, To ensure Personal Windows 10 Devices are registered before a user accesses an application the below should help you; 1) Go to Azure Active Directory > Conditional Access > Terms of Use 2) Create a Terms of Use but ensure that ‘Require users to consent on every device’ is set to ‘On’. This ensures that every device must be registered with Azure AD prior to gaining access. 3) Create a Conditional Access Policy including the Apps in which you require the Device to be Azure AD Registered. 4) In ‘Device State’ target ‘All Device States’ but exclude ‘Hybrid… Read more »
Thx for the tip Alex!
Oktay, what an amazing series of aricles. Many thanks for the work!
Thanks Oktay for a wonderful series of articles. They have been super helpful for me to test and deploy the WIP-WE policies. Alex, thanks for the reply. I followed your instructions and was able to trigger device registration when signed in from new devices. Initially we are planning to enable this only for Windows devices and later roll it out to iOS and Android, so I have included only Windows devices in the CA policy, but the device registration is triggered from iOS and Android devices also. Can’t we restrict the Terms of Use on new devices to specific platforms… Read more »
Great article! Small question: Does this also works in a scenario where the user is not Azure AD registered? So is Azure AD registration is mandatory to use this? What is the best way to use this for BYOD?
Hi John, WIP without enrollment is for BYOD scenario’s where users add a work account to their device and register with Azure AD without MDM enrolling the device in Intune. Have a look at another post I wrote about “Configuring Intune MDM User Scope and MAM User Scope for Windows 10” and check the schema under “Different scenarios worked out”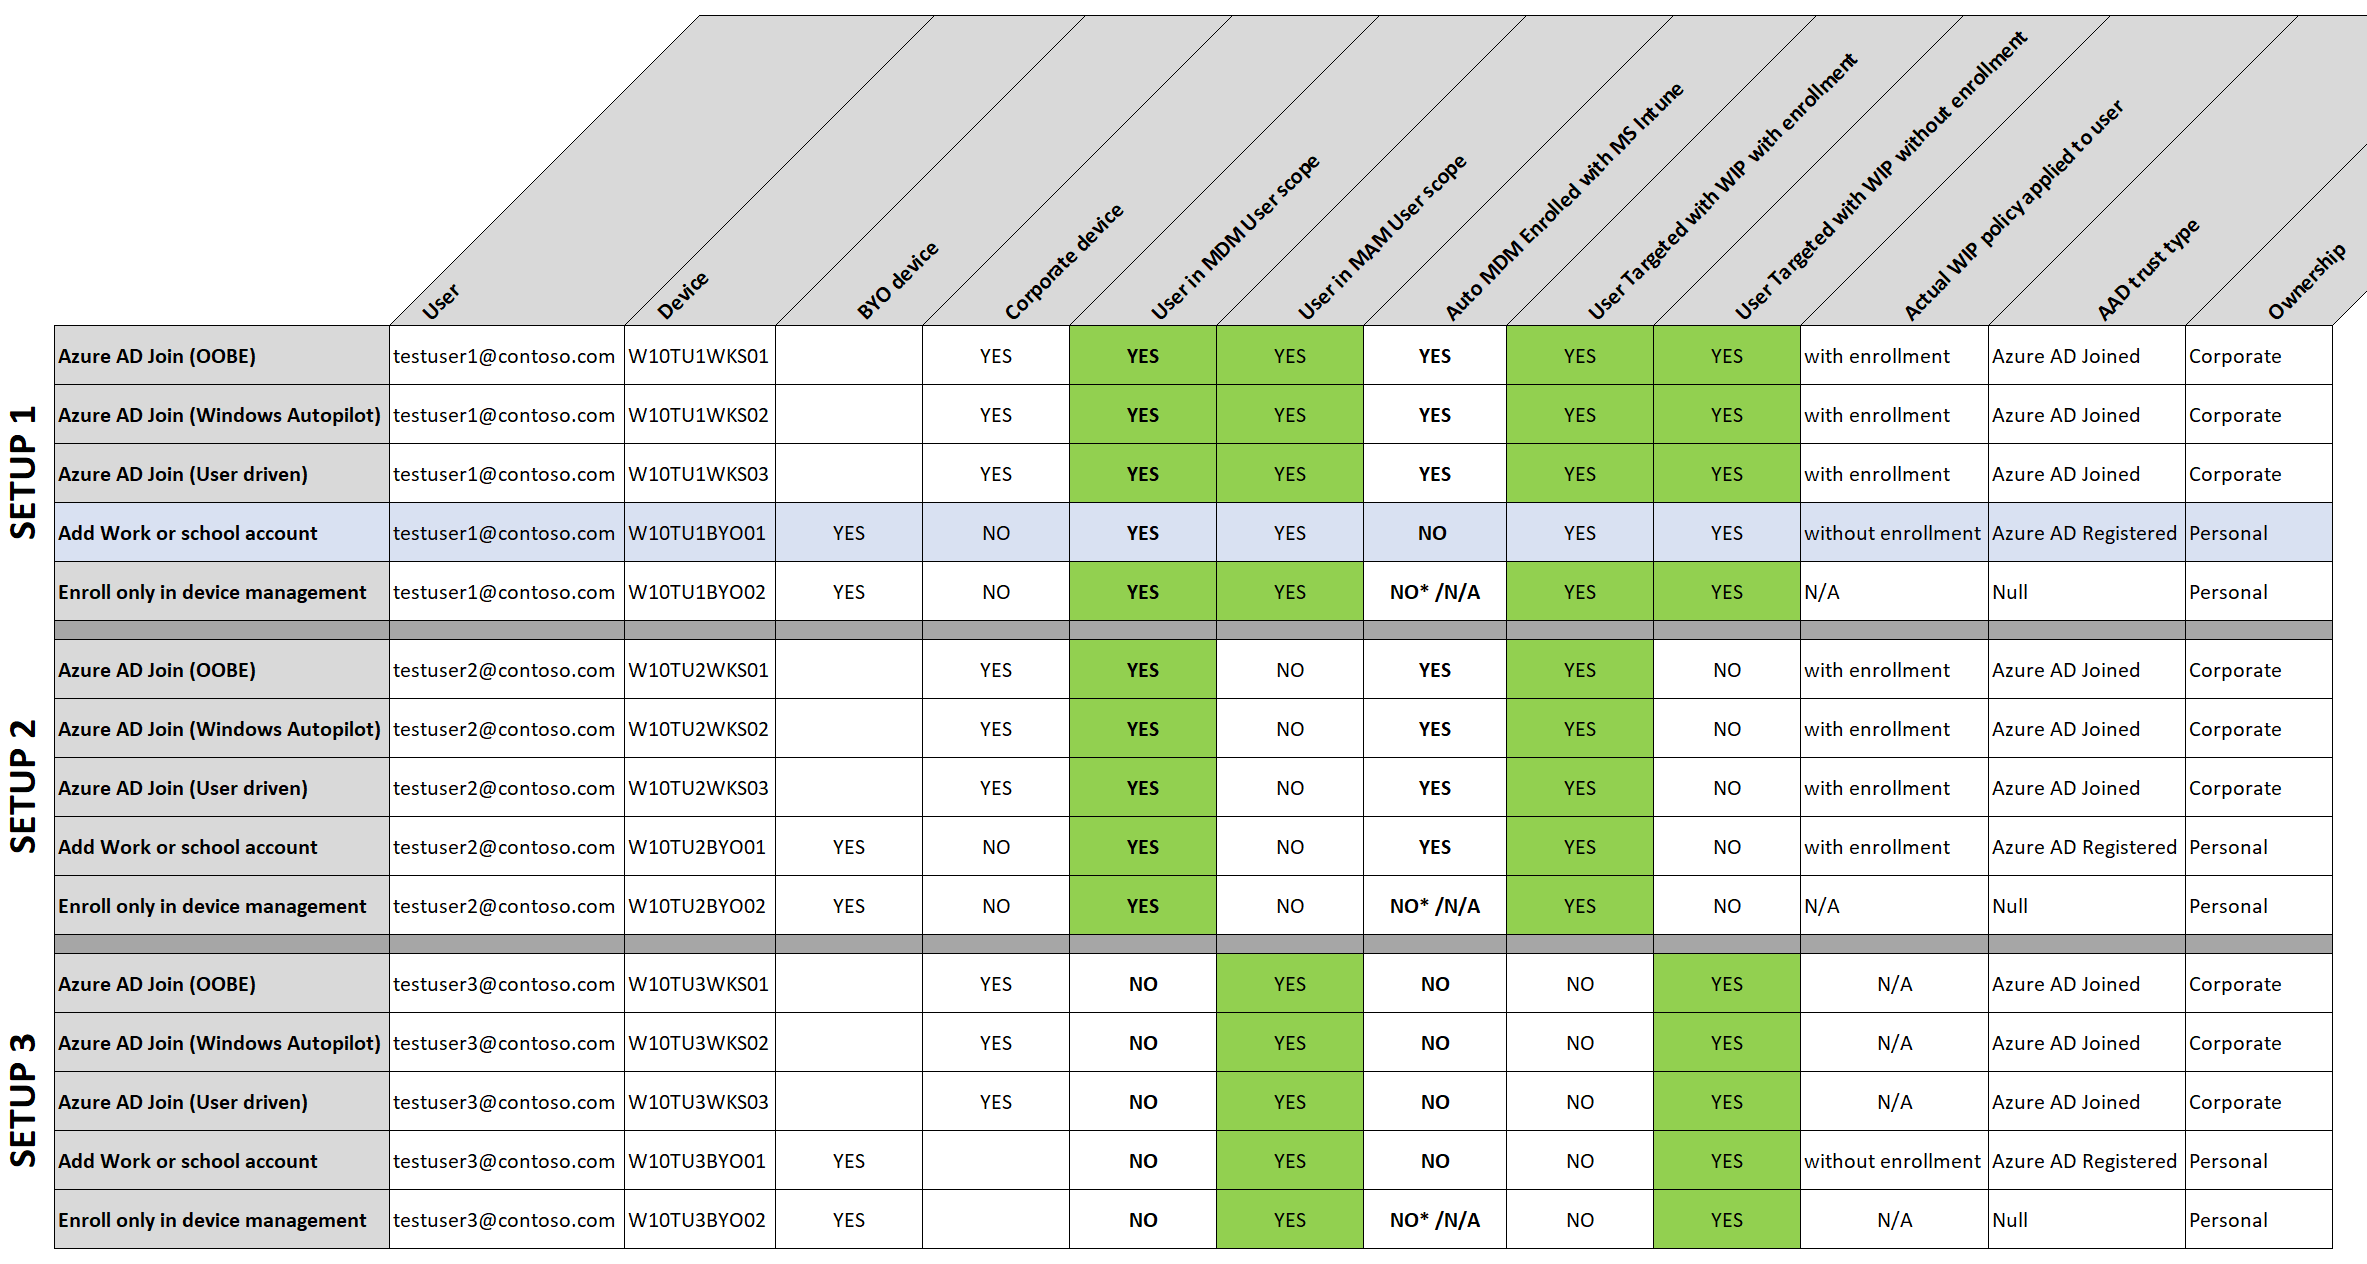
https://allthingscloud.blog/configuring-intune-mdm-user-scope-and-mam-user-scope/
Hope this helps
Oktay, you are the man! Keep up the good work 🙂
Thx Stephan! Much appreciated. I do try to keep up but it’s been a while. I did managed to free up some time so keep coming back for more post this month
Dear Oktay, thank you for your detailed tutorials and thank you for taking time to prepare and share .
Hi Heero, Thank you! Always good to hear my post help
By the way I followed all of your tutorials regarding WIP and BYOD. very helpful but I got stuck at one point and I have been scratching my heads for answer since then. I registered MDM devices but did not enrolled them to MDM (Intune). Now no matter what I do, I am unable to see available apps in company portal (I don’t even think I have access to my company portal. does it mean BYOD must be enrolled in Intune or must be managed by Intune in order to download and have access to company portal ?
Hi Heero, Currently all Windows app types require enrollment. The short answer; You cannot deploy apps to BYOD or assign apps as Available to BYOD. You can Assign apps as Available to iOS/iPadOS and Android devices only. When you add a Windows 10 Store App to Intune and assign it, you only have the option to assign it as Available for enrolled devices. Win32 app can be assigned to Windows 10 as Required, Available for enrolled devices and Uninstall. The same is true for LOB, MSI and apps like Edge or Office 365. Have a look at these 2 documents… Read more »
Hi Oktay, Thanks for your really useful guides. I am just going through setting up a WIP for Windows 10 without Enrollment policy. I have followed your steps and have the policy configured in “Allow Overrides” mode at the moment but have hit a bit of an issue…. On the machine I am using for testing I have Windows 10 Home 1909 with OneDrive (Personal) and OneDrive (Business) accounts signed in. When I try and open a notepad file from my OneDrive Business the policy works perfectly and the file shows me that it has opened in the protected policy.… Read more »
Hi Phil and Oktay
I have exactly the same behaviour. I’m pretty sure all of the cloud resources etc… are configured correctly.
I am only using OneDrive signed in with an ‘enterprise’ account.
Any suggestions gratefully received, as i’ve exhausted pretty much everything I am aware of trying!
Thanks
Lee
All
Seems that the policies are fine, but there is an option in the OneDrive Client Settings, under the Office/File collaboration… Disabling this, enables the opening/saving of Office files into OneDrive with WIP enabled policies.
Implication then that users will not be able to collaborate/share documents which will be a business decision!
Hope that helps….
Lee
Thanks Lee, good spot!
I will give it a try on my test machines.
Lee, just to follow-up, that sorted it – thanks!
If it helps in your scenario I only had to untick the office collaboration button for my work OneDrive. I left it ticked for my personal OneDrive and it is still working perfectly.
Lee, as you are obviously looking at this for your devices got another couple of quick questions…do you see real inconsistencies in how long it takes for devices to pickup changes you might make to the WIP policy? I am finding some devices don’t seem to get the changes (or it can take days) regardless of how many times I press sync from Settings > Access to work and school It is really frustratingly when trying to test different scenarios! Also have you found anyway to enforce that Win 10 devices have to have a WIP policy assigned in order… Read more »
Hi Phil,
Are you sure the all devices are registered with Active Directory?
See the comment above by Alex Bakker.
[…] WIP-WE / MAM – Windows Information Protection without enrollment […]
Hi,
I want to add external app to this policy, or simply exempt,
like i want to add Autocad to this policy, so that autocad files can be downloaded from outlook and can be opened in autocad software,
I am just explaning for the example that how can we add or exempt apps other than Microsoft apps.
will be waiting for your kind response.
Hi. Thank you for this great Tutorial. I am stuck with one question. Maybe you can help? What if I only want to allow access from BYODevice to corp. data with Edge for Windows and absolutely no way to download anything? Neither encrypted nor unencrypted. No download must be possible, no matter what the inconvenience. The background is, among other things, that already the file names are a secret. Users should be able to read and write mails, manage appointments, collaborate in Teams, and create or change files with the web versions of Office. Nothing more. Nothing more. I find a… Read more »